
Kindness in Blue
This tutorial was written by me on April 21, 2014, using PSP X but any version will work. This tut is written assuming you have a working knowledge of PSP. Any similarity to any other tutorial is purely coincidental.
This tutorial was written by me on April 21, 2014, using PSP X but any version will work. This tut is written assuming you have a working knowledge of PSP. Any similarity to any other tutorial is purely coincidental.
Supplies needed:
"Kindness In Blue" Scrap kit by Ladyhawwk Designs Scrapkits available CLICK HERE.
Tube of choice - I used the beautiful work of Suzanne Woolcott.
gemsmask 223 available at Gems Taggin' Scraps
Eye Candy filter Perspective Shadow - free download HERE.
Font of choice - I used Euphorigenic Font available HERE
*Remember to save often and add a Drop Shadow as you go.
To begin, open a blank canvas 600 x 600. Selections – select all.
Open the paper of your choice and copy. I used paper 1. Paste onto your blank canvas by pasting into selection. Deselect.
Open the paper of your choice and copy. I used paper 1. Paste onto your blank canvas by pasting into selection. Deselect.
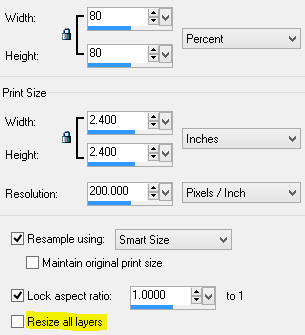
Apply the mask I suggested or one of your choice. Merge group. Duplicate once & merge down. Resize 80%, but do not check the box "resize all layers".
Next, open Frame 1. Copy & paste as a new layer.
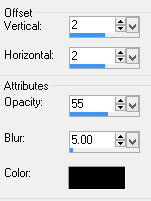
Add a drop shadow using Eye Candy Perspective Shadow - I used these settings:

(If you do not have Eye Candy, you can add a regular drop shadow using the settings of your choice.)
Next, open your tube. Copy and paste as a new layer, resizing as needed. Apply the same perspective shadow as before.
You will need to open these elements and word art:
Word Art 1
element 3/butterfly & resize 20%
flower elements 37, 38, & 39 resize 30%
Copy and paste, arranging as you like or as I did in the tag above.
Apply a drop shadow using these settings:
Open element 47 & resize 35%. copy and paste as a new layer. Move it down so it is under the frame layer & above the mask layer. Position it to peek our from the lower right hand corner of the frame. Duplicate and go to Image - Mirror. Move it so it peeks out from behind the upper left hand corner of the frame. Merge down and add the drop shadow (same as above).
Now we are ready to Merge Visible. I added a few white twinkles to mine. If you do not have any, here is a copy of the one I used. I resized it by 50% and copy/pasted as a new selection. No drop shadow on twinkles!

Add copyright. Using the crop tool, trim off the extra bit of canvas but make sure you leave space to add your text. Save as a PNG file.
Thank you for trying this tutorial!
Scrapkit in Blue, I can't download down, a pity.!! :(
ReplyDeleteWaltraud
Gorgeous tut!! Thank you!
ReplyDelete