Blog title

Welcome to Escape From Reality Blog!
"The world of reality has its limits; the world of imagination is boundless." --Jean-Jacques Rousseau
Showing posts sorted by relevance for query gradient. Sort by date Show all posts

Saturday, August 13, 2022

Easy Name Tag Tutorial by Kelli

Easy Name Tag
Summer ♥ Create A Tutorial Hello-10
This tutorial was written on 8-11-22, by Kelli.

For this tag you will need:
A gradient of choice
and a tube of choice.
I am using a tube by Bobbie Allen
Find her and Marilyn's art at
Please remember to use appropriate
copyright and follow her TOU.
Thanks!

Ready?
Open a new image 500x500 With a transparent background.
You may need to resize your canvas depending on how long the name or text is
Grab your text tool and choose your font.
I am using Jumping Flash size 48. Stroke 2; Kerning -150.
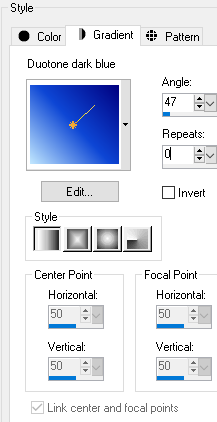
Foreground Black, b/g a gradient of choice.
Here are my settings
Summer ♥ Create A Tutorial Ss_gra10


Add your text
Align in center of canvas, convert to raster.
With your magic wand, and the gradient layer active,
Click inside each letter.
Expand the selection by 3.
Add a new raster layer and drag it to bottom.
Flood fill with White.
Keep selected and contract the selection by 6.
Add a new layer and drag it above the gradient layer.
Go effects and cut out with these settings
Summer ♥ Create A Tutorial Ss_cut10

and then repeat the cutout.
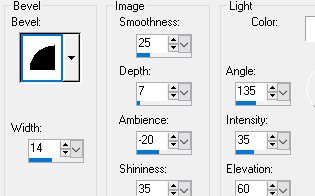
Deselect and activate the white layer
Add an inner bevel with these settings
Summer ♥ Create A Tutorial Ss_inn10

Activate the gradient layer, select all, selections float and then defloat,
Contract the selection by 2.
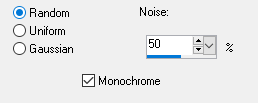
Add noise with these settings
Summer ♥ Create A Tutorial Ss_noi11 

And then repeat the inner bevel.
Deselect.
Merge visible.
Add your tube.
I resized this tuby by 35%
Sharpen
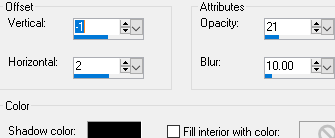
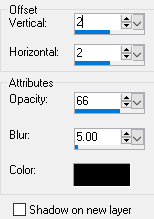
Add drop shadow of choice.
Here are my settings
Summer ♥ Create A Tutorial Ss_dro10

Crop and then add copyright.

Save as a PNG.
Thanks for trying my tutorial!
I would love to see your results!
Kelli

[You can find more of Kelli's awesome tutorials at her blog, Mimi's Madness.]

Saturday, March 30, 2019

Easter Snag by Kathyfrances

Recently the members of Escape From Reality had the privilege of working with the scrapkit 'Fairy Party' by Bella Carabena www.dreamingwithbella.com. I used it to make the background cluster and combined it with the work of ©Sherri Baldy. I used a stamp I purchased and colored from Sherri Baldy's store www.mybestiesshop.com.

Feel free to snag it and add your name. I only ask that you do not change the copyright or offer it as a WWO. See my TOU for more info. Need help adding your name? Stop by the forum and we will be glad to assist! http://escapefromreality.forumotion.co.uk

Here is the snag tag:
(click on image to open to full-size, then save as usual)


Here is the background/cluster I made using the gorgeous scrapkit 'Fairy Party' by Bella Caribena www.dreamingwithbella.com:
(click on image to open to full-size, then save as usual)

Here it is with more of a background:
(click on image to open to full-size, then save as usual)

I made a gradient to create the background colors and used 
a mask to get the look I wanted. Here is the gradient, 
just in case you have a use for it. Enjoy!

Friday, June 19, 2026

No Scraps "Mermaid Bubbles" Exclusive EFR Tag Tutorial & Template by Penny¢

These lovely templates were made by Penny¢, a fabulous tagger from the EFR
forum! The images are samples; you can get the template in layers by clicking
the link below:


And this amazing tutorial was written by by Penny¢ as well, using the templates show above!


No Scraps "Mermaid Bubbles" Exclusive EFR Tag Tutorial 
Original tutorial by Penny¢

Supplies:

"Sleeping Mermaid" tube/image by Lisa Victoria (www.lisavictoria.net)_tube/license currently available at DAH (https://www.digitalartheaven.com/store/)
"Circles" EFR Exclusive Template available at the EFR Blog

Fonts: Alignment

Filters:
Tramages_Tow The Line
Carolaine and Sensibility_CLDots
Xero_Fritillary
Eye Candy 4000_Gradient Glow
Penta.Com_Jeans
DSB Flux_Bright Noise

When working with templates, always Shift+D to duplicate, close original.
On each layer, either:
A: Select with magic wand
B: Ctrl+A, Ctrl+F. Ctrl+Shift+F (select all, float, de-float)
ANL, do the tutorial steps required
Close/delete original template layer
B: Use the Manual Color Correction Tool
*Note: Method B is the option I use, so you may need to select your layer first before adding any effects*

Open template, duplicate, close original
Make a gradient: Colors_#63306e and  #be9cc4_Angle 35_Repeats 3
FF Background layer
Duplicate
Effects_Texture Effects_Fine Leather:
White_30_40_250_40_4
Opacity_30
Tramages_Tow The Line_80_54_48_9
Large Oval_Fill with same gradient, changing angle to 119
Penta.Com_Jeans_18_4
C/P tube/image_Blend Mode_Overlay
Large Oval Frame_#986bd5
Add Noise_Gaussian 25
**For each Circle Layer, repeat the following:
Add a portion of the image you like
Duplicate for 3 layers
Bottom Layer_EC 4000_GG_3_25_100_#986bd5**
Circles 1 & 2_Duplicate again (4 layers)
Top Copy_Adjust_Blur_Gaussian 5
Middle Layer_Xero_Fritillary_5_30_10_20
Blend Mode_Overlay
Circles 3 & 4_Top Layer_Blend Mode_Burn
Circles 5 & 6_Carolaine and Sensibility_CLDots_50_3_2
Frame_#986bd5_Add Noise_Gaussian 25
Add all correct copyright/license info
Whew! Still with me? LOL
Animating...(If not animating, just add the GG, noise, DS to the bottom layer of each Circle ONLY.
No Duplicating anything)
Duplicate EACH GG layer 3 times (4 layers each)
Bottom GG Layer_DS_0_0_75_15_Black
On EACH of the other 3 GG layers, add DSB Flux_Bright Noise_30
Be sure to click "MIX" for each layer
Close out the top 2 Flux layers for each circle
***When done, you should have these layers:
Circles 1 & 2: 7 Layers_Bottom GG & DS_Next 3 - GG & Noise_Next Layer - Fritillary_Blend Mode Normal_
Next 2 Layers - Fritillary_Blend Mode Overlay
Circles 3 & 4: 6 Layers_Bottom GG & DS_Next 3 - GG & Noise_Next Layer -  Next Layer_Normal -
Next Layer - Blend Mode_Burn
Circles 5 & 6: 5 Layers_Bottom GG & DS_Next 3 - GG & Noise_Next Layer -  C & S_CLDots
That's a lot of layers!!
Now, the easy part...animate as usual!!

***Alternatively, you could simply merge the original circle layers 1 & 2, 3 & 4, and 5 & 6
together before adding the GG and duplicating. That would reduce the number of layers.
But, I wrote this as I was going along, and I already have my million layers, so going with it now, LOL.

(This tut was written by Penny¢ for exclusively for EFR)

Sunday, April 21, 2024

Word art by Paula "No one"


Just right click & save, the word art is in PNG format.
The last one is extra if you like to use it.
Forgot to save its original without gradient glow and shadow....


Friday, February 25, 2022

Tutorial: 'Breakfast with Cuddly Rigor Mortis' by Mimi's Madness


This adorable tag was the result of a tutorial written by Kel, an amazing tagger & tutorial writer from our EFR forum! The tut is called Breakfast with Cuddly Rigor Mortis and can be found at her blog, Mimi's Madness. It uses a mask & gradient found here at the blog! Please let us know if you do the tutorial, we'd love to show off your results!

Friday, February 18, 2022

Tutorial: 'In Like A Lion' by Mimi's Madness


This gorgeous tag was the result of a tutorial written by Kel, an amazing tagger & 
tutorial writer from our EFR forum! The tut is called In Like A Lion and can be found at 
her blog, Mimi's Madness. It uses a mask & gradient found here at the blog!

Please let us know if you do the tutorial, we'd love to show off your results!
Thank you, Kel!

Tuesday, March 1, 2022

Tutorial: 'Easter' by Mimi's Madness


This adorable tag was made using the tutorial Happy Easter by Kelli, owner of  the blog 
Mimi's Madness. You can find the tut at https://purplehearts7591.blogspot.com. It uses a 
gradient from the blog and a tube by Marilyn Allen, our resident artist!

If you do the tutorial, please let us know! We love to show off your results here at the blog!

Sunday, October 13, 2024

Too much? Word art by Paula


 If you see 2x WA of the same colour,
one of them has a white gradient glow on/around it.
WA is larger than shown.
To save WA at full size, click to open then save as usual.